
Make the act of Watching TV Unnecessarily Difficult and Complex With Linux and MythTV
6th Apr 2012, 18:14:52
I've been using a DVD-RAM recorder to record digital (Freeview) TV for some time. Although it works OK, this looks like a rather old fashioned way to record TV compared to modern multi-terabyte PVR boxes that can be bought off the shelf. Further, it can't take advantage of the Freeview HD channels which recently became available in my area.
Although PVR appliances work well, they have limits. I'm interested in the ability to stream video to various devices around the house, and to have the capability to offload video onto removable media. I expect to be able to do as I wish with my files, so I want my TV to be no exception.
Difficulty
I underestimated the difficulty of this project by quite a wide margin. It took six months worth of spare time before I was satisfied with the whole system.
For the frontend I needed a small form factor PC with enough horsepower to play HD content. I wanted to stay within a reasonable budget, but still wanted a quiet, cool and power efficient system. I was a little rusty with the nuts-and-bolts of PC hardware, so optimising this proved to be a real crash course.
However, it's possible to acheive very satisfactory results for just a few hundred pounds.
Technologies Used
With the right hardware and some free software, it's possible to use an ordinary PC as a PVR. I opted to use MythTV, because it seems to be the most widely used right now.
In order to properly plan a system, it's necessary to understand some basic facts about the technologies that deliver digital TV to your home. I am focussing on systems used in the UK, which differ from those used elsewhere in Europe and the rest of the world. Make sure that you understand exactly how TV is delivered in your country before you purchase any hardware.
Freeview: Freeview is the over-the-air digital service which can be received through a television aerial. The standard definition broadcasts use the DVB-T standard, which is well supported by a broad range of hardware. Content is delivered over six multiplexes (or muxes), with ten channels per mux.
In many areas, FreeviewHD is becoming available. This is a single mux which broadcasts four channels in 1080 HD. FreeviewHD uses the DVB-T2 standard. This is a completely different standard to DVB-T; DVB-T cards can not understand HD DVB-T2 broadcasts. Although FreeviewHD capable TV sets have been available for a while, DVB-T2 PC hardware is only just becoming available.
In 2011, there was no single device which could concurrently receive DVB-T and T2 broadcasts in Linux, but cards are starting to appear with this capability, such as the TBS6280 I selected.
Satellite: Satellite TV is available through Sky or Freesat. Both services use the DVB-S standard for standard definition TV and DVB-S2 for HD broadcasts, however Sky's transmissions are encrypted. The only way to decrypt Sky channels is by using a Sky box, so the only way to record these is by using a Sky receiver and an analogue capture card in your PC. This is very fiddly. Freesat transmissions are not encrypted and can be received directly using a DVB-S card in much the same way as Freeview.
DVB-S and DVB-S2 are different standards and require different capabilities to receive them. There are devices which can receive both concurrently.
Cable: Cable broadcasts use the DVB-C standard. You're not allowed to connect your own DVB-C devices to the cable network, but it's technically possible. Many channels are encrypted, so it's not possible to decode these in Linux.
In my view, Freesat provides the best free-to-air solution right now because the DVB-S and S2 standards have the best hardware support. Given that even the most basic satellite dish will be installed with quad-LNBs, it's possible to concurrently watch and record many programs with a single multi-tuner capture card.
The Gory Details
As I mentioned, I chose to use MythTV - specifically mythbuntu which is a ready rolled Ubuntu+MythTV Linux distribution. I opted for the a TBS6280 dual-tuner DVB-T(2) PCIe capture card and a single-tuner TBS8922 DVB-S(2) PCI capture card. This gives me three tuners and the capability to received every free-to-air channel offered on Freeview or Freesat.
I want to be able to watch my content in several places, so I knew I would want to split my setup into a backend and several frontends. MythTV has excellent support for this system architecture.
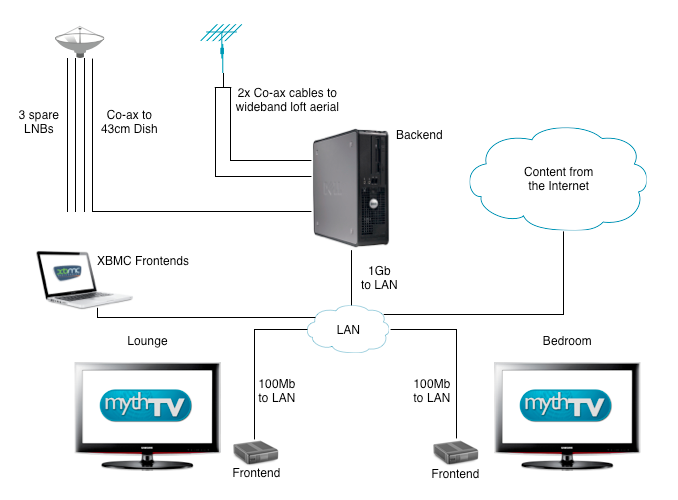
My backend is a Dell Optiplex 755 SFF. This is a Core 2 Duo system with 1GB RAM, to which I have added a very ordinary 250GB SATA drive. This backend lives in an unused part of the house along with all my other noisy equipment.
Mythbuntu is a straightforward install, I started out with the frontend and backend on the same box for simplicity. I think this is the best approach to start out with if you're new to MythTV.
The drivers for my 6280 capture card were next, they were a little bit trickier. There's no packaged version, so it's necessary to build from source. This is actually quite easy, even if you've not built software from source before:
Install the necessary packages from the repositories:
$ sudo apt-get -y install linux-headers-generic build-essential unrar
Download drivers from the TBS website. cd to the location of the downloaded file and uncompress:
$ mkdir tbs && cd tbs
$ unrar e ~/Downloads/tbsdriver.rar
$ tar xf linux-tbs-drivers.tar.bz2 && cd linux-tbs-drivers
You need to specify which CPU architecture you are using. If you're unsure, run:
uname -i
If you're using an i386 32-bit kernel, run only:
$ sudo chmod +x ./v4l/tbs-x86.sh
$ sudo ./v4l/tbs-x86.sh
or for a 64-bit kernel, run only:
$ sudo chmod +x ./v4l/tbs-x86_64.sh
$ sudo ./v4l/tbs-x86_64.sh
Now build the modules:
$ sudo make
$ sudo make install
Either load the modules:
$ sudo modprobe saa716x_tbs_dvb
or reboot the box:
$ sudo shutdown -r now
If all is well, your card will be detected during boot:
dmesg | grep -i dvb

[   19.672434] DVB: registering new adapter (SAA716x dvb adapter)
[   19.852667] DVB: registering adapter 0 frontend 0 (TurboSight TBS 62x0 DVBT frontend)...
[   19.854974] DVB: registering new adapter (SAA716x dvb adapter)
[   20.009100] DVB: registering adapter 1 frontend 0 (TurboSight TBS 62x0 DVBT frontend)...
My card has two tuners, so it shows as two devices, adapter 0 and adapter 1.
Let's tell MythTV about them using mythtv-setup. mythtv-setup is a GUI program, so it needs to be run from inside a window manager:
$ mythtv-setup
If this is the first time you've run MythTV setup, you'll get asked some questions, such as whether you want your user to be added to the mythtv group. Unless you know better, you can just accept the defaults. Eventually, you get an interface similar to the MythTV frontend:

It's a good idea to go into General and change the IP address from 127.0.0.1 to the real IP address of the box, since this will catch you out later when you want to add other frontends. Once this step is complete. go to 'Capture cards' select this and choose 'New Capture Card'.

Choose DVB DTV capture card (v3.x), the other settings should be filled out for you. If you have more than one tuner, do this for each tuner.
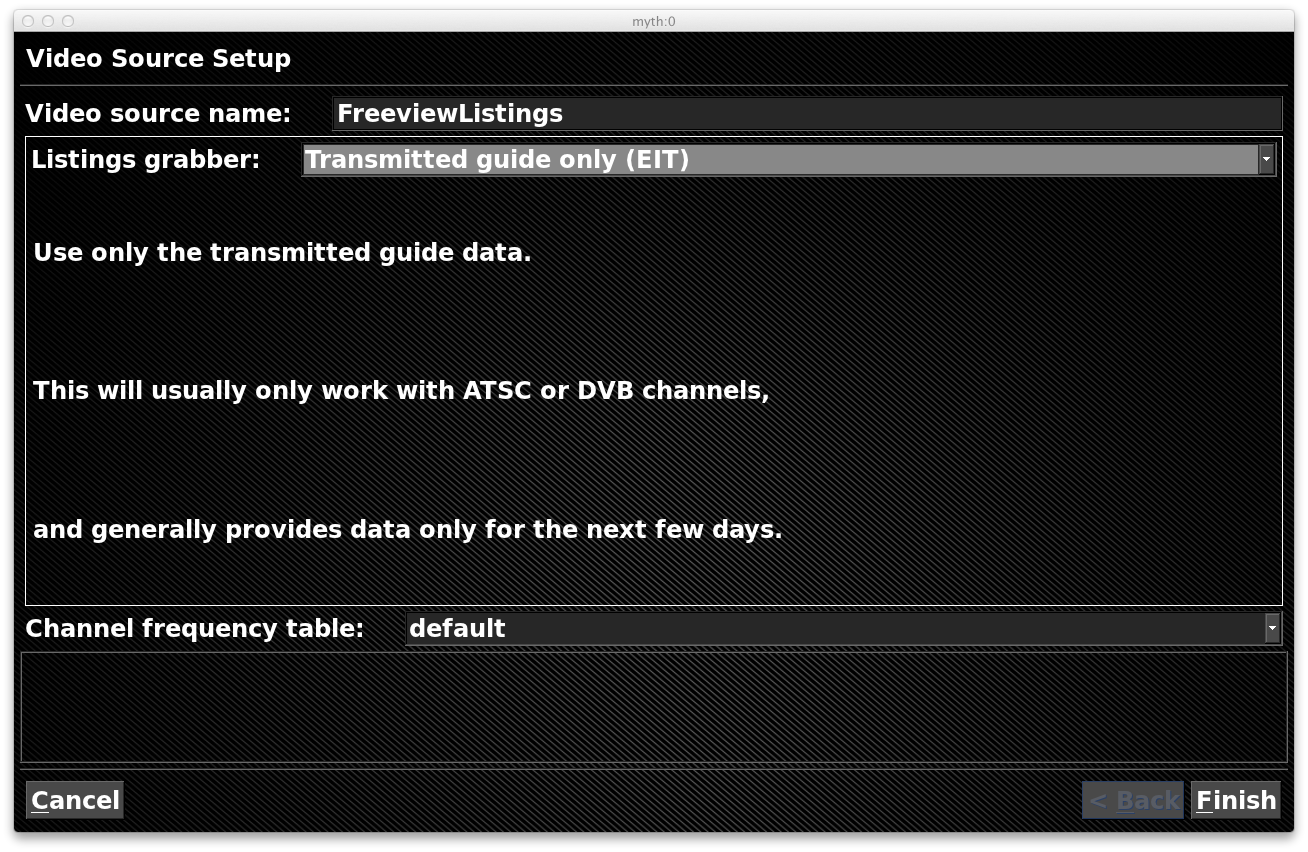
Next, configure 'Video Sources'. You'll want to add a new source. This is a poorly named section in my view, it's purpose is to collect TV listings to act like a freeview box's electronic programme guide. For now, just choose EIT only, which is over-the-air data. You can play with XML listings later:
Next, 'Input Connections'. This section associates programme data with a particular capture source. Associate each tuner with your FreeviewListings source you created a moment ago:

Choose 'Scan for channels', then choose your country and specify 'TV and Radio'. This takes a while. Don't worry about reported 'Timed out' messages. MythTV seems to be rather poor at figuring out what channel numbers to use. It also struggles if there is more than one instance of each channel available and reports them as 'conflicting' channels. Just choose 'Insert all' and then mash 'Suggest' and 'OK', we can sort out the proper numbers for the channels quite easily in a minute. Once you've finished this process, you can exit mythtv-setup by hitting ESC a few times. When prompted, choose yes to run xmlconfig.
The process is different for Freesat with DVB-S(2) cards, the cards need to be told some details about the radio signal being broadcast from the satellites. This guide explains it perfectly well, so I'm not going to reproduce it here.
At this point, you're probably itching to - you know - watch some TV, so start the MythTV frontend. You can do this from the GUI, click: Applications -> Multimedia -> MythTv Frontend.
You'll notice that the channels aren't on the right numbers. You can re-arrange the channel numbers from within mythtv-setup, but this is very tedious. MythTV stores its channel information in a MySQL database. As you'd expect, this makes it rather simple to manipulate. There are lots of examples on the MythTV wiki, but none of them do exactly what I want.
Firstly, configure tv_grab_uk_rt - we're going to use this to retrieve XML information about our channels, so configure this answering questions like so:
$ tv_grab_uk_rt --configure

Encoding:
0: UTF-8 (Unicode)
1: ISO-8859-1 (Latin-1)
Select one: [0,1 (default=0)] 0

Enable title processing?:
0: Enable title processing
1: Disable title processing
Select one: [0,1 (default=0)]

Enter the first part of your postcode: [none] ST11
Select which TV platform you use:
0: None of these, I'll choose my channels
1: Freeview
2: Sky Digital
3: VirginMedia TV
4: FreeSat
5: FreeSat from Sky
6: Analogue
Select one: [0,1,2,3,4,5,6 (default=0)] 0

Select the channels that you want to receive data for.
4Music [yes,no,all,none (default=no)] all
Now, use tv_grab_uk_rt to dump a list of channels, you'll need to refer to this in case my SQL is out of date.:
$ tv_grab_uk_rt --list-channels --output uk_channels.xml
Establish a connection to the MySQL database and run these SQL commands:
$ mysql -u root -p mythconverg
Now, copy and paste in the SQL statements from my wiki page. I keep this list as up-to-date as I can, but no guarantees. If you find a problem, please edit!
You will now have all channels assigned to the right Freeview channel number and with the correct XML information recorded, which is useful if you want to use XML programme listings. Each time you need to rescan for new or changed channels, you must update and run this SQL to assign the correct channel numbers.
It can be helpful to use the web interface 'mythweb' to get an overview of what channels have been added. It's included by default in mythbuntu.
That pretty much concludes the backend setup.
Before frontends can be added, some small tweaks must be made to the backend to allow remote frontends to connect. Firstly, if you have not already done it, re-run mythtv-setup to ensure that all instances of '127.0.0.1' are replaced with the actual IP address of the backend. Check that this is also the case for the files /etc/mythtv/mysql.txt and /etc/mythtv/config.xml. Next, check that MySQL is configured to allow remote connections in /etc/mysql/conf.d/mythtv.cnf:
[mysqld]
bind-address=0.0.0.0
Finally, you may need to grant slightly looser permissions on the MySQL database in order to allow the frontends to query it directly. Look up the correct password value from /etc/mythtv/mysql.txt:
$ mysql -u root -p mythconverg
mysql> grant all on mythconverg.* to 'mythtv'@'%' identified by 'thepassword';
Make a note of these credentials because you'll need them for each frontend.
The Frontends
My most important frontend lives in my lounge and connects to our Samsung HD TV. The hardware I selected for this task is a Zotac ION-ITX-A mini ITX board. This is an Intel Atom 1.2GHz CPU with and embedded NVidia 'ION' GPU, which is actually a GeForce 9400M graphics chipset. I housed this in an M350 mini ITX case, which is cheap and looks very discreet.
I installed XBMCbuntu on my frontend, since I wanted to try out XMBC, and because it already has many optimisations I wanted.
This Zotac system is only just powerful enough for this role, and even then some careful tuning is needed. By default, the BIOS only allocates 256MB of the installed RAM to the GPU, this can be set as high as 512MB and I did so. The Zotac uses dual-channel memory, so it requires an identical DIMM installed in both available memory slots. This RAM must be DDR2 PC6400 (800MHz) - Only this will do - I have tested with a single PC6400 DIMM and with two PC5300 modules with poor results.
Ubuntu doesn't include the latest NVidia drivers by default, but it is a simple matter to add them:
$ sudo apt-add-repository ppa:ubuntu-x-swat/x-updates
$ sudo apt-get update
$ sudo apt-get install nvidia-current
I installed MythTV from the Ubuntu repository:
$ sudo apt-get install mythtv
Run MythTV and go into Setup -> General. Fill in the details for your backend, which should be something like:
Hostname: 192.168.2.200
Database: mythconverg
Port:
User: mythtv
Password: Fhhfdsh
Sometimes MythTV won't find the correct audio output, I needed to specify that it should use the HDMI output for sound. You can list the available devices with:
$ sudo aplay -L
My device is plughw:0,3 which I found through trial and error with:
$ sudo aplay -D plughw:0,3 /usr/share/sounds/alsa/Front_Left.wav
Best performance results when MythTV can set your TV to the same refresh rate as the video source. The easiest way to acheive this is to allow MythTV to set this automatically. Go to Setup -> Appearance. Skip to the 'Video Mode Settings' page and tick the 'Separate video modes for GUI and TV playback' box. Assuming you have an HD TV, set GUI and Video output to 1920x1080, but set 'Rate' to 'Any' and 'Aspect' to 'Default'. There should be no need to set any overrides.
No further setup was needed for me.
Remote Control
Many people use remote controls designed for use with Microsoft Windows Media Center Edition, referred to as MCE remotes. It's likely that your capture card will be supplied with such a remote and and infrared receiver, but all my capture cards are in the backend. Instead, I elected to use a keysonic KSK-3203, which is a very small bluetooth QWERTY keyboard. It's useful to have a list of keyboard shortcuts handy when you're new to myth.