
Cheap, Easy and Encrypted Backups With Time Machine on Leopard
31st Jan 2009, 14:56:17
I used Linux to make Time Machine work better than Apple intended. Read on for details of the wonders of iSCSI.
Most Leopard users agree that Time Machine is a great way to back up your Mac; it's easy to set up, it's automatic and it's easy to restore old files.
I have some special requirements (as usual!) which Time Machine can't meet in its standard configuration:
- Not encrypted: Time Machine backups are not encrypted, anyone who steals my external drive could read my data. Using FileVault gets round this, but then my home directory is backed up only when I am logged out. This is not acceptable.
- Doesn't work with network shares: Many years ago I learned a hard lesson about not keeping backups separate from the source data - a faulty power supply destroyed both my source and backup disk and I lost everything. It's a good idea to at least store backups on a different machine. There are hacks to enable Time Machine with network shares, but I have experienced inconsistent results with this.
A bit about iSCSI
This is where iSCSI comes into the equation. Hopefully this diagram explains the mechanics of it:

The MacBook Pro is running an iSCSI initiator - think of this as an iSCSI client. It is used to connect to the iSCSI target (the 'share') on the Debian Linux box. When the MacBook connects to the iSCSI target for the first time it sees a blank disk which would be partitioned and erased in exactly the same way as any physical disk. Crucially, Time Machine can't tell the difference between an iSCSI disk and a real disk.
It is worth noting that iSCSI works at the block level, it is not a network share like AFP or Samba/CIFS is. If two machines were to mount the disk at the same time they would corrupt it - fortunately, this is impossible with the configuration I'm about to create.
Get on with it you fool
Yes, well all right. The first thing to do is find an old PC. Any old PC will do provided you can stuff big enough disks in it. I chose an old HP mini-tower and then bought a couple of extra 500GB SATA disks to go in it. I then installed Debian Etch on the first 80GB disk, leaving the 500GB drives untouched. Annoyingly, the iSCSI modules aren't available in Etch, so I dist-upgraded to Lenny. You could just as easily use the latest Ubuntu if you prefer.
So, by this point you should have a pristine Debian Lenny or Ubuntu install working on the PC.
At this point I will build a RAID array. If you don't require RAID, skip to the encryption part below.
Make sure the appropriate support is installed:
# apt-get install mdadm
Once you're sure you know the correct device names, instantiate the RAID:
# mdadm --create --verbose  /dev/md0 --level=raid1 --raid-devices=2 /dev/sd[cd]
mdadm: size set to 488386496K
mdadm: array /dev/md3 started.
We need to tell mdadm about the RAID so that it can check for problems. Find the RAID's UUID with mdadm:
# mdadm --examine --scan
ARRAY /dev/md0 level=raid1 num-devices=2 UUID=77004f79:3bc3c381:e72a2d57:3cde0288
Paste this line into /etc/mdadm/mdadm.conf. You may wish to set an email address for alerts while you're in there.
Encryption
To fulfil the security requirements, I shall encrypt the device. This requires a package:
# apt-get install cryptsetup
Set a password for the new encrypted device:
# cryptsetup luksFormat /dev/md0

WARNING!
========
This will overwrite data on /dev/md0 irrevocably.

Are you sure? (Type uppercase yes): YES
Enter LUKS passphrase:
Verify passphrase:
Command successful.
Decrypt and open the device:
# cryptsetup luksOpen /dev/md0 crypt-raid
Enter LUKS passphrase:
key slot 0 unlocked.
Command successful.
Note the decrypted data accessible to the OS is now /dev/mapper/crypt-raid - you can
treat this exactly as though it were a physical drive.
We want the encrypted device to be decrypted each time the system boots, so we must add it to the
/etc/crypttab file:
# vi /etc/crypttab

# <target name>	<source device>		<key file>	<options>
crypt-raid      /dev/md0            none        luks
As it stands, you will have to enter the password to decrypt the device each time the Linux machine boots. This might be what you want - but my machine has no monitor most of the time so I use a USB key instead. If I need to boot the machine I just insert the USB key to authenticate myself.
Create the following script:
# vi /usr/sbin/crypto-usb-key.sh #!/bin/sh # Part of passwordless cryptofs setup in Debian Etch. # See: http://wejn.org/how-to-make-passwordless-cryptsetup.html # Author: Wejnif [ "x$1" = "x" -o "x$1" = "xnone" ]; then KEYF=root.key else KEYF=$1 fi MD=/tmp-usb-mount echo "Trying" >&2 mkdir -p $MD modprobe usb-storage >/dev/null 2>&1 modprobe vfat >/dev/null 2>&1 sleep 7 OPENED=0 for SFS in /sys/block/sd*; do DEV=`basename $SFS` F=$SFS/${DEV}1/dev if [ 0`cat $SFS/removable` -eq 1 -a -f $F ]; then echo "> $DEV" >&2 mount /dev/${DEV}1 $MD -t vfat -o ro 2>/dev/null if [ -f $MD/$KEYF ]; then cat $MD/$KEYF umount $MD 2>/dev/null OPENED=1 break fi umount $MD 2>/dev/null fi done if [ $OPENED -eq 0 ]; then echo "FAILED" >&2 echo -n "Uh oh " >&2 read -s -r A echo -n "$A" else echo "I found the keyfile on the USB drive. Hooray!" >&2 fi
Don't forget to make it executable.
# chmod +x /usr/sbin/crypto-usb-key.sh
Now choose a file on your USB drive to be your keyfile. The content of the file is not important, it could be a text document, an audio file, whatever. Just be aware that if even a single bit changes, the keyfile is no longer valid. Obviously this should look like some random file you carry around, 'keyfile.txt' would be a poor choice (duh)!
Use cryptsetup to add your keyfile:
# mkdir /keyfile
# mount /dev/sd-whatever /keyfile
# cd /keyfile
# cryptsetup luksAddKey key-file.ext
# cd
# umount /keyfile
# rm -r /keyfile
Edit your crypttab to take account of the keyfile:
# vi /etc/crypttab

# <target name>	<source device>		<key file>	<options>
crypt-raid      /dev/md0            keyfile.ext luks,keyscript=/usr/sbin/crypto-usb-key.sh
Rebuild the initrd (not sure if update-grub is needed, but can't hurt!):
# update-initramfs -u all
# update-grub
Reboot (with USB drive in) and test. This concludes the encryption portion.
iSCSI itself
We now need to install the iSCSI tools and modules:
# apt-get install iscsitarget iscsitarget-modules-2.6-686
Now, edit /etc/ietd.conf:
# vi /etc/ietd.conf

IncomingUser made-up-user hard-password

# Target should be date YYYY-MM, fully qualified hostname (reversed) then, make up a disk name.
Target iqn.2009-01.spruce.san:disk2
	IncomingUser made-up-user hard-password
	# This is the device you just created with cryptsetup
	# can also be a 'normal' device like /dev/sdb if you didn't encrypt
	Lun 0 Path=/dev/mapper/crypt-raid,Type=fileio
	# This is the default anyway - but let's be explicit!
	MaxConnections 1
Now, restart the iSCSI service:
# /etc/init.d/iscsitarget restart
Believe it or not, that's all you have to do to the Linux box, head on over to the Mac.
Leopard doesn't have an iSCSI initiator, but GlobalSAN have created one and give it away for free, so download and install it.
Once your initiator is installed, go to System Preferences and configure it:
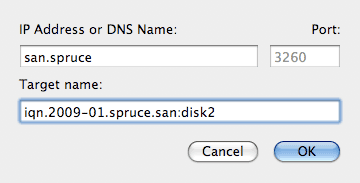
In the Targets tab, add your iSCSI target.
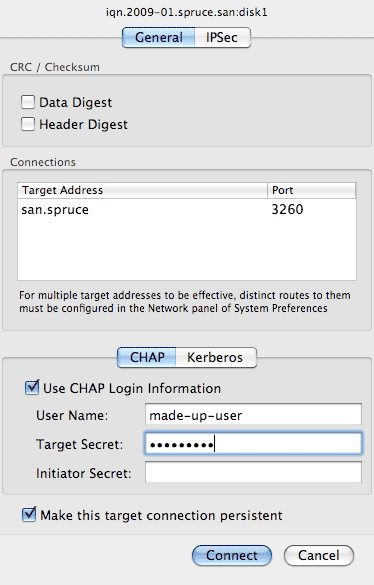
In the sessions tag, log in to your target.
If you open Disk Utility, you'll be able to see your iSCSI disk, you can erase it just as you would any other disk. When you do so, Time Machine will ask whether you want to use it as your Time Machine disk.
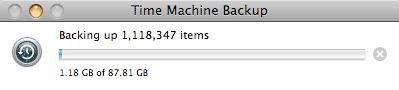
Enjoy your automated, encrypted resilient backups.
Footnotes
- Encryption is only a good defence against physical, bare-metal attacks (someone steals your server), it provides no protection against attacks on a running system.
- If you forget your password and lose your keyfile, then there is no realistic way to recover the data from your device. The only recourse would be to wait 25 years until computers are powerful enough to brute force the encryption used.
To change the password or keyfile on an encrypted volume:
What keys already exist?
# cryptsetup luksDump /dev/md0
LUKS header information for /dev/md0

Version:        1
Cipher name:    aes
Cipher mode:    cbc-essiv:sha256
Hash spec:      sha1
Payload offset: 2056
MK bits:        256
MK digest:      59 48 02 cc cd 91 37 ae 01 f5 ce 09 f6 09 dd 4f f2 84 0a 50
MK salt:        89 7d fb a7 a5 e4 c2 dd a3 0b 2a ab 1f 01 cf 47
                2c a7 dd 36 bf af 7f af 60 aa a0 a7 24 23 5c 96
MK iterations:  10
UUID:           b3f577e7-c0d4-4f8b-a25b-a563ce9d8328

Key Slot 0: ENABLED
        Iterations:             55145
        Salt:                   5b a0 4c 54 99 99 99 99 4c 67 b8 58 5d 97 80 24
                                67 8e e7 bc 35 5e d5 95 25 aa aa d0 42 8c 96 20
        Key material offset:    8
        AF stripes:             4000
Key Slot 1: DISABLED
Key Slot 2: DISABLED
Key Slot 3: ENABLED
        Iterations:             54610
        Salt:                   5b 96 f9 21 92 84 2a 1a da 45 ae a6 14 8b be 64
                                93 1e 42 b4 c2 c4 71 c2 ae 45 db 93 f0 fa b9 2a
        Key material offset:    776
        AF stripes:             4000
Key Slot 4: DISABLED
Key Slot 5: DISABLED
Key Slot 6: DISABLED
Key Slot 7: DISABLED
There are keys in slots 3 and 0. The key in slot 0 is the password, don't remove that unless you really mean to.
Add the new keyfile
# cryptsetup luksAddKey /dev/md0 new-key-file.jpg
Delete the old one
# cryptsetup luksDelKey /dev/md0 3
If the keyfile has a different name, remember to edit /etc/crypttab
crypt-raid /dev/md0 new-key-file.jpg luks,keyscript=/usr/sbin/crypto-usb-key.sh
Rebuild initrd with the new settings
# update-initramfs -u all
# update-grub