
Free wireless access with sensible controls
22nd Sep 2007, 16:36:02
I want to share my internet connection with my friends and anybody who happens to be nearby, that's just the kind of great bloke I am. What I don't want to do is open up my internet connection to every Azureus and BitTorrent leech in the neighbourhood. I do this using a combination of shorewall and squid.
This method does not provide very fine-grained control, for example if you are seeking password authenticated access, I suggest you take a look at chillispot.
I already had a Power Mac running Debian Linux acting as my gateway, you'll need to be doing this too in order to get the iptables redirection stuff to work.
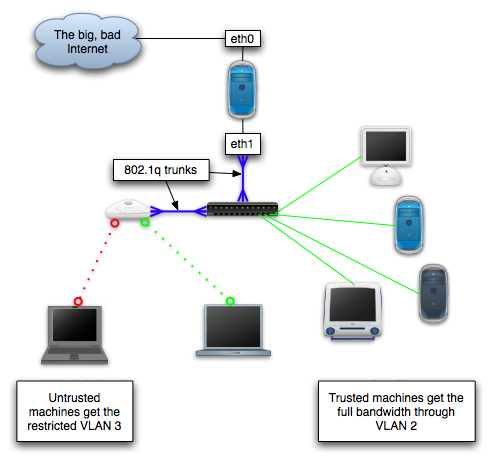
I have the use of a very powerful and flexible access point, a Cisco Aironet 1230. This lots of cool stuff, like support 802.1q VLANs. Because of this, it makes sense for me to use VLANs to partition off the public access, but you could just as easily stick another ethernet card in the gateway and hook up a second access point to that.
First I configured my gateway to use VLANs. In this (made up) example, 192.168.0.0/24 is my internal network. I have decided to assign the public network 10.0.0.0/24. My public and private networks will both be connected to eth1. I am not using VLAN 1 because that is the native (untagged) VLAN. It is good practice to keep traffic off this VLAN, which becomes evident if you work with large networks.
# modprobe 8021q
# echo 8021q >> /etc/modules

# apt-get install vlan

# vconfig add eth1 2
# vconfig add eth1 3

#ifconfig eth1 0.0.0.0
#ifconfig eth1.2 192.168.0.1 broadcast 192.168.0.255 netmask 255.255.255.0 up
#ifconfig eth1.3 10.0.0.1 broadcast 10.0.0.255 netmask 255.255.255.0 up
Do bear in mind that if you are connected by eth1, this will kill your connection! Make the configuration permanent by editing vi /etc/network/interfaces:
# The private vlan
auto eth1.2
iface eth1.2 inet static
        address 192.168.0.1
        netmask 255.255.255.0
        network 192.168.0.0
        broadcast 192.168.0.255

# The public vlan
auto eth1.3
iface eth1.3 inet static
        address 10.0.0.1
        netmask 255.255.255.0
        network 10.0.0.0
        broadcast 10.0.0.255
eth1 needs to be brought up at boot time, but should not be assigned an IP address. Delete it from /etc/network/interfaces if present and create a script to bring it up unconfigured:
# vi /etc/network/if-up.d/eth1

 #!/bin/sh
 ifconfig eth1 up

#chmod +x /etc/network/if-up.d/eth1
At this point, I'll configure the switch port that eth1 is connected to as a trunk and set the ports my hosts are connected to to be in the right VLAN:
js-switch>
js-switch>en
Password:

js-switch#vlan database
js-switch(vlan)#vlan 2 name Private state active
js-switch(vlan)#vlan 3 name Public state active
js-switch(vlan)#exit

js-switch#conf t
Enter configuration commands, one per line.  End with CNTL/Z.

js-switch(config)#interface VLAN2
js-switch(config-subif)#description Private
   ! Put a management address on the Private LAN
js-switch(config-subif)#ip address 192.168.0.99 255.255.255.0
js-switch(config-subif)#no shut
js-switch(config-subif)#exit

js-switch(config)#interface VLAN3
js-switch(config-subif)#description Public
js-switch(config-subif)#no ip directed-broadcast
js-switch(config-subif)#no ip route-cache
js-switch(config-subif)#no shut
js-switch(config-subif)#exit

js-switch(config)#interface range f0/1 - 10
js-switch(config-if)#switchport access vlan 2
js-switch(config-if)#spanning-tree portfast
js-switch(config-if)#exit

js-switch(config)#interface FastEthernet0/5
js-switch(config-if)#description Power Mac g3-fw (eth1)
js-switch(config-if)#switchport trunk encapsulation dot1q
js-switch(config-if)#switchport mode trunk
js-switch(config-if)#switchport trunk allowed vlan 1-3
js-switch(config-if)#end
js-switch#copy run start
Lets set up a port for the access point while we're here.
js-switch(config-if)#interface f0/7
js-switch(config-if)#description Cisco 1230
js-switch(config-if)#switchport trunk encapsulation dot1q
js-switch(config-if)#switchport trunk native vlan 2
js-switch(config-if)#switchport trunk allowed vlan 1-3
js-switch(config-if)#switchport mode trunk
VLAN 2 is the native VLAN here because its management IP address is in that VLAN.
Check everything is correct:
js-switch#sh vlan
VLAN Name                             Status    Ports
---- -------------------------------- --------- -------------------------------
1    default                          active
2    Private                          active
3    Public                           active
js-switch#sh int status

Port    Name               Status       Vlan     Duplex Speed   Type
------- ------------------ ------------ -------- ------ ------- ----
Fa0/1   iMac               connected    2        A-Full   A-100 100BaseTX/FX
Fa0/2   Power Mac (OS X)   connected    2        A-Full   A-100 100BaseTX/FX
Fa0/3   Power Mac (Debian) connected    2        A-Full   A-100 100BaseTX/FX
Fa0/4   Red booted cable u notconnect   3          Auto    Auto 100BaseTX/FX
Fa0/5   Power Mac g3-fw (e connected    trunk    A-Full   A-100 100BaseTX/FX
Fa0/6   Karen's PC         connected    2        A-Full   A-100 100BaseTX/FX
Fa0/7   Cisco 1230         connected    trunk    A-Full   A-100 100BaseTX/FX
Fa0/8   Indigo iMac G3     notconnect   2          Auto    Auto 100BaseTX/FX
Fa0/9   Axis Camera Back   notconnect   2          Auto    Auto 100BaseTX/FX
Fa0/10  LC 475             connected    2        A-Half    A-10 100BaseTX/FX
Fa0/11                     connected    3        A-Full   A-100 100BaseTX/FX
Fa0/12                     notconnect   1          Auto    Auto 100BaseTX/FX
Fa0/13                     notconnect   1          Auto    Auto 100BaseTX/FX
Fa0/14                     notconnect   1          Auto    Auto 100BaseTX/FX
Fa0/15                     notconnect   1          Auto    Auto 100BaseTX/FX
Fa0/16                     notconnect   1          Auto    Auto 100BaseTX/FX
Fa0/17                     notconnect   1          Auto    Auto 100BaseTX/FX
Fa0/18                     notconnect   1          Auto    Auto 100BaseTX/FX
Fa0/19                     notconnect   1          Auto    Auto 100BaseTX/FX
Fa0/20                     notconnect   1          Auto    Auto 100BaseTX/FX
Fa0/21                     notconnect   1          Auto    Auto 100BaseTX/FX
Fa0/22                     notconnect   1          Auto    Auto 100BaseTX/FX
Fa0/23                     notconnect   1          Auto    Auto 100BaseTX/FX
Fa0/24                     notconnect   1          Auto    Auto 100BaseTX/FX
You might want to try rebooting the Linux box at this point to make sure that the relevant interfaces are brought up properly at boot-time.
Tell the Access point about the VLANs you've created
ap(config)#bridge irb

ap(config)#dot11 ssid mylan
ap(config-ssid)#vlan 2
ap(config-ssid)#authentication open
ap(config-ssid)#authentication key-management wpa
ap(config-ssid)#mbssid guest-mode
ap(config-ssid)#wpa-psk ascii xxxxxxxxxx
ap(config-ssid)#exit

ap(config)#dot11 ssid public
ap(config-ssid)#vlan 3
ap(config-ssid)#authentication open
ap(config-ssid)#guest-mode
ap(config-ssid)#mbssid guest-mode
ap(config-ssid)#exit

ap(config)#interface Dot11Radio0
ap(config-if)#encryption mode ciphers tkip
ap(config-if)#encryption vlan 2 mode ciphers tkip
ap(config-if)#ssid mylan
ap(config-if)#ssid public
ap(config-if)#mbssid
ap(config-if)#speed basic-1.0 basic-2.0 basic-5.5 6.0 9.0 basic-11.0 12.0 18.0 24.0 36.0 48.0 54.0
ap(config-if)#station-role root
ap(config-if)#no dot11 extension aironet
ap(config-if)#no cdp enable
ap(config-if)#exit

ap(config-if)#interface Dot11Radio0.2
ap(config-if)#encapsulation dot1Q 2 native
ap(config-if)#no cdp enable
ap(config-if)#bridge-group 1
ap(config-if)#exit

ap(config-if)#interface Dot11Radio0.3
ap(config-if)#encapsulation dot1Q 2 native
ap(config-if)#no cdp enable
ap(config-if)#bridge-group 1
ap(config-if)#exit

ap(config-if)#interface FastEthernet0.2
ap(config-if)#encapsulation dot1Q 2 native
ap(config-if)#bridge-group 1
ap(config-if)#exit

ap(config-if)#interface FastEthernet0.3
ap(config-if)#encapsulation dot1Q 2 native
ap(config-if)#bridge-group 1
ap(config-if)#end

ap#copy run start
You must incorporate the new LAN, 10.0.0.0/24 into your existing NAT setup. I use shorewall, so it's just a matter of removing eth1 from the configuration and replacing it with eth1.2 and eth1.3.
/etc/shorewall/interfaces
#ZONE   INTERFACE       BROADCAST       OPTIONS
net     eth0            detect          tcpflags,norfc1918,routefilter,nosmurfs,logmartians
loc     eth1.2          detect          dhcp,tcpflags,detectnets,nosmurfs
pub     eth1.3          detect          dhcp,tcpflags,detectnets,nosmurfs
vpn     tun0
Take a minute to consider other services which might be configured to bind to eth1, change them to
listen on eth1.2 and eth1.3. Hint: grep 'eth[09]' /etc/default/*
Add some rules to allow hosts on the public network to do things. It's better to deny everything in /etc/shorewall/policy and allow exceptions here. There is a DNAT line in here to redirect web traffic to Squid, best to leave it commented out for testing though.
# From the firewall to the public network
Ping/ACCEPT       fw              pub
SSH/ACCEPT        fw              pub


# From the local network to the public network
Ping/ACCEPT       loc             pub
SSH/ACCEPT        loc             pub


# From the public network to the local network
#   My DNS server is on the private LAN
DNS/ACCEPT        pub             loc:192.168.0.81
DNS/ACCEPT        pub             loc:192.168.0.2
#   So is my mail server
IMAP/ACCEPT       pub             loc:192.168.0.2
SMTP/ACCEPT       pub             loc:192.168.0.2
# Redirect requests on port 80 to my squid on the private LAN
# Leave this commented out for now
#DNAT              pub             loc:192.168.0.2:3128     tcp     80      -

#
# From the public network to the internet
#
Web/ACCEPT        pub             net
ACCEPT            pub             net                     tcp     443
IMAP/ACCEPT       pub             net
SSH/ACCEPT        pub             net
POP3/ACCEPT       pub             net
Rsync/ACCEPT      pub             net
NTP/ACCEPT        pub             net
FTP/ACCEPT        pub             net
Ping/ACCEPT       pub             net
At this point you should be able to connect a host to the public network, have it pick up a DHCP address in the 10.0.0.0/24 network and be NATed through to the internet. Whoop-de-doo.
For the next part, you'll need to have Squid running somewhere. I recommend that you install it on a machine other than the firewall, but you can run it there if you must. You need to add a couple of things to /etc/squid/squid.conf to get it to act as a transparent proxy:
httpd_accel_port 80
httpd_accel_host virtual
httpd_accel_with_proxy on
httpd_accel_uses_host_header on
Don't forget to allow the public network:
acl Public src 10.0.0.0/24
http_access allow Public
You can now uncomment the line in /etc/shorewall/rules that redirects traffic on TCP 80 to the squid. Test it!
Note: It's also possible to do this with plain old iptables.
Next comes the actual bandwidth controls using delay pools. This is done in /etc/squid/squid.conf:
# I have one delay pool
delay_pools 1

# It is a class two pool, designed for a class c (/24) network
delay_class 1 2

# Limits are expressed as: pool number, overall limits (fillrate/capacity),
# per host limits (fill/cap):
# Pool 1 fills at 512kbit/s and holds 5 MByte.  Each host bucket fills at
# 256kbit/s
# and holds 2MByte.
delay_parameters 1 65536/5242880 32768/2097152

# Pool 1 is accessed by the IP range described by the 'Public' acl
delay_access 1 allow Public
Squid works with the concept of pools and buckets. A bandwidth pool is available to a whole network and holds a specific amount of traffic, in this case 5 MBytes. The pool itself is divided into buckets, each host having exactly one bucket of bandwidth.
The pool can be emptied if there are many hosts who have all emptied their buckets. It will only fill back up to 5 MB if the hosts reduce their traffic and will only do so at 512kb/s. An individual host's bucket can be emptied in the same way, but only refills at 256kb/s.
The perceived effect of this is that a download will run at full speed for the first 2MB, but drop down to 256kb/s after that. In this way, web surfing and email runs fast (at the full speed of my link), but leechers get very little bandwidth. The whole public network can only ever sustain 512kb/s, or about 25% of my bandwidth, so my traffic can never get swamped by my guests!
If someone insists on abusing the connection, it's easy enough to ban them based on their MAC address. I tend to do this on the access point itself because it is easy:
ap#conf t
ap(config)#access-list 700 deny 0016.b6ca.d020 0000.0000.0000
ap(config)#access-list 700 deny 0003.93a2.2b5e 0000.0000.0000
ap(config)#access-list 700 permit 0000.0000.0000 ffff.ffff.ffff
ap(config)#dot11 association mac-list 700
It is of course trivially easy to change the MAC address in proper operating systems, but I've never had to go further than this to stop an abuser.
Footnote: For testing and troubleshooting purposes, I found it useful to know that you can connect a trunk to an OS X machine and assign it interfaces in various VLANs:
sudo ifconfig vlan3 create
sudo ifconfig vlan3 vlan 3 vlandev en0
sudo ifconfig vlan3 inet 10.0.0.3 netmask 255.255.255.0
sudo ipconfig set vlan3 dhcp

# To revert:
sudo ifconfig vlan3 destroy