
Serving a Web Site With Apache on Mac OS X
10th Dec 2003, 08:27:39
It's easy to host your own Web site on your Mac. All you need is a Mac running OS X and a DynDns.org account. Reasons you might want to do this:
- You want more than the measly 15 MB of Web space that your ISP gave you
- You want to do things that your ISP won't let you do on their server - PHP, MySQL, etc.
- Because you can or just because it's fun
Running a Web server violates many ISPs terms of service and some will get stroppy about it. You might want to check your ISP's TOS before you begin so you know what you are getting yourself in to.
Getting on with it...
Apache is a very secure, powerful and stable Open Source Web server. Both server and client editions of OS X include Apache in the default install - and this isn't a watered down, featureless version, it's the same Apache that runs almost 70% of Web sites out there. To start the Apache daemon (httpd), all you need to do is go into 'System Preferences --> Sharing' and tick the 'Personal Web Sharing' tickbox:
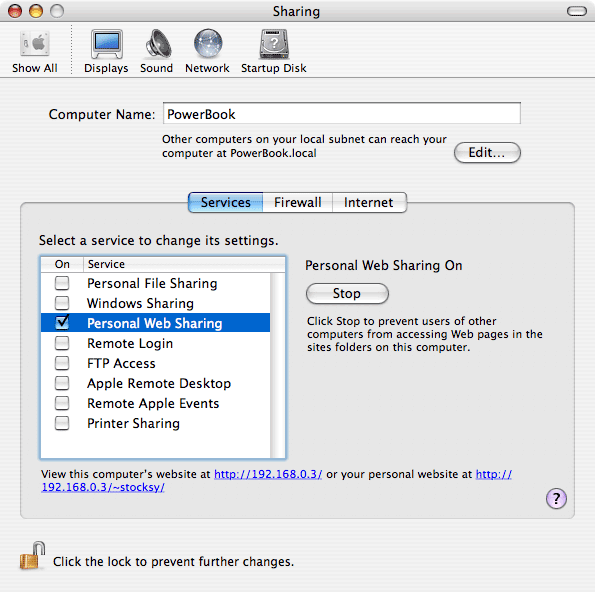
While you're in there, it's a good idea to switch to the Firewall tab and start the firewall if it's not active, unless you have a good reason to have it turned off. Don't worry, OS X knows to leave port 80 open for the Web server you just started.
Lets test the server, open up your favourite browser and point it at http://127.0.0.1/, the loopback address. Hopefully, you'll see something like this:
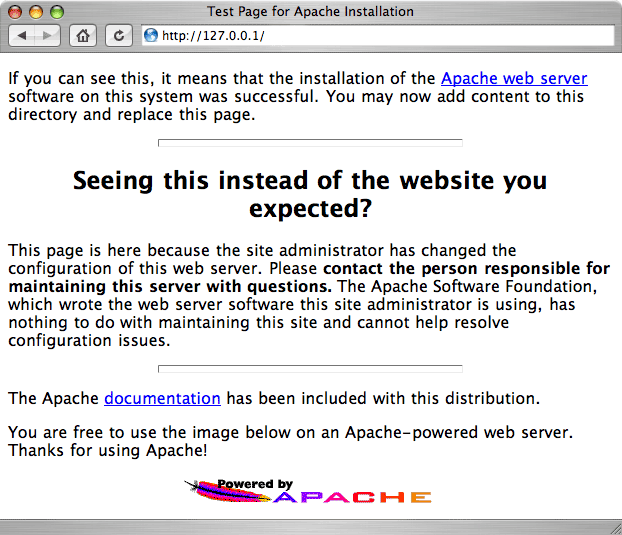
So, we've got the server running and its serving a test page. I'm sure you'd rather it was serving your content! Apache's root directory is '/Library/WebServer/Documents/'. It's a good idea to delete all the files in here, but you might like to leave the Alias to 'manual' in there, since this allows you to quickly see the manual by pointing your browser to http://127.0.0.1/manual/. When you've done that, just drag your files to the '/Library/WebServer/Documents/' folder.
Now that you've got all your wonderful content on your server, it's time to let the rest of the world access it. This is where DynDNS comes into play. Firstly, you'll need to create an account at dyndns.org. Some routers, such as a netgear RP114 support DynDNS directly:
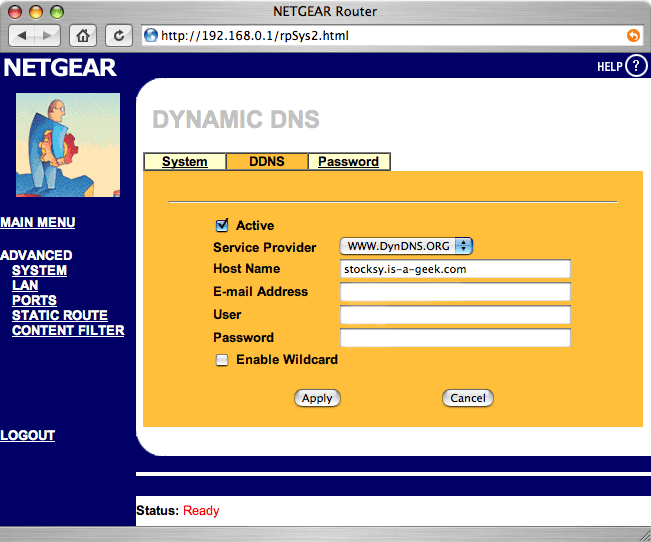
If your router supports DynDNS, just enter your account details. If, like mine, your router has no DynDNS support, or you don't have a router, you'll need to download an updating client and configure it.
Now that you have your DynDNS hostname pointing at your IP, you need to configure your router to accept incoming connections on port 80 - this is known as port forwarding. Each model of router is different, but it just boils down to accepting port 80 connections on the external interface and forwarding them to an address on your LAN - this will need to be a static IP address, so if your Web server doesn't have one, assign it one now. As a sidenote, some ISPs block incoming connections on port 80 (and many other ports). If your ISP does this, it can be easily defeated, as I'll show you.
Configuring the server - httpd.conf
You can configure Apache by changing values in /etc/httpd/httpd.conf, this file is read each time Apache starts up, and you'll need to restart Apache before any of your changes take effect.
Begin by making a backup of httpd.conf so that you can go back if you make a mess! Type this in the terminal:
sudo cp /etc/httpd/httpd.conf /etc/httpd/httpd.conf.good
If you have a favourite plain text editor, use that to edit the file. If you haven't chosen a text editor, you might like to use Pico, since I think this is the easiest command line editor and comes with OS X. To get Pico to open the file, type
sudo pico /etc/httpd/httpd.conf
in the terminal (Applications --> Utilities --> Terminal). Navigate the cursor with the arrow keys. The following commands are the essentials:
| Save (write Out) this file | control+o |
| eXit Pico | control+x |
| Find | control+w |
| Page down | control+v |
| Page up | control+y |
| Show Cursor position | control+c |
Apache's configuration file is full of comments to help you determine what each option does and if you've ever used a .conf file, it will be very familiar to you. Lines prefaced with a '#' are 'commented out' and do nothing. There isn't much you need to change to get up and running.
Changing the port
Here's how to defeat your ISP's port blocking - it won't be necessary for most people. Find the section that says
# Port: The port to which the standalone server listens. For

# ports < 1023, you will need httpd to be run as root initially.

#

Port 80
Change the value for 'Port' to some other number, then append this to your address, e.g http://stocksy.is-a-geek.com becomes http://stocksy.is-a-geek.com:81. This is awkward and looks ugly, but if you don't like it you'll have to complain to your ISP (or switch ISPs and tell them why, if that option is available to you).
Setting the Server Name
Find the line that says
#ServerName blaze.
Remove the '#' and change 'blaze' to the domain name that your server resides at (the one you created with DynDNS.org), eg
ServerName stocksy.is-a-geek.com
Hostname Lookups
Find the line that says HostnameLookups Off and change it to HostnameLookups On. You will want to do this so that the access and error logs show the hostname as well as the IP of each person who visits.
Jaguar and earlier - access and error logs
This step is not necessary in Panther, and may well crash httpd if you do it.
Find the line
ErrorLog "/private/var/log/httpd/error_log"
comment it out and replace it with
ErrorLog '|/usr/sbin/rotatelogs "/private/var/log/httpd/error_log %d-%m-%Y" 1209600'.
Also find the line
CustomLog "/private/var/log/httpd/access_log" common
comment it out and replace it with
CustomLog '|/usr/sbin/rotatelogs "/private/var/log/httpd/access_log %d-%m-%Y" 1209600' common
What this does is have Apache pipe the logs the rotatelogs program, the number is the number 1209600 is the number of seconds it waits before rotating the logs. I've set it to two weeks, but you could specify any number of seconds you want.
Users
By default, Apache will create a directory for every user on your mac so you'll get http://stocksy.is-a-geek.com/~james, http://stocksy.is-a-geek.com/~chris, http://stocksy.is-a-geek.com/~karen and so on. Each of these directories serves the contents of the users' 'sites' folder in their home directory. To stop this behaviour, find the line
Include /private/etc/httpd/users/*.conf
and comment it out.
Finishing up
Press control+o, enter, control+x to save and exit Pico. Type
sudo apachectl configtest
to test your changes. With luck, you'll get:
PowerBook:~ stocksy$ sudo apachectl configtest

Syntax OK
If you get an error like this:
PowerBook:~ stocksy$ sudo apachectl configtest

Syntax error on line 89 of /etc/httpd/httpd.conf:

Invalid command 'foo', perhaps mis-spelled or defined by a module not included in the server configuration
check the config file for typos at the line indicated. If you've really screwed up, restore the backup httpd.conf with
sudo cp /etc/httpd/httpd.conf.good /etc/httpd/httpd.conf
Any changes you make to the httpd.conf file will only take effect once you restart apache, which can be done from the Sharing Preference Pane (untick and re-tick Web sharing). You can also use the following commands from the terminal:
sudo apachectl stop
sudo apachectl start
More to do
I find that the weekly cron job occasionally causes httpd to crash. Just after the weekly job runs, I set cron to run a perl script. This checks that Apache is still running and if not, starts it. This is the crontab entry I use to invoke it:
45 * * * * root perl /Library/Scripts/apachecheck.pl
This entry checks every hour, which is good enough for me.
I've now covered the essential basics you need to get your Mac serving static content. You might also be interested in my page about
XHTML, or my pages about PHP
and MySQL.
Note: If you're interested in compiling Apache yourself, you might like to read these notes.