MySQL on OS X
17th Aug 2005, 19:40:27
MySQL is a doddle to use in OS X. As a database to power web sites (such as this one), it's hard to beat.
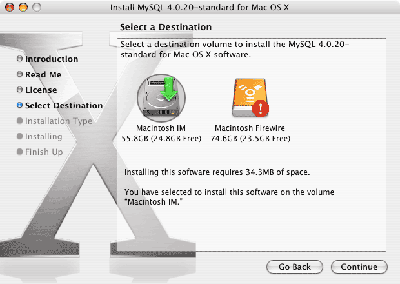
Installing MySQL is easy thanks to the installer package provided by MySQL. Go to the MySQL download page and choose the version marked as the GA release, which at the time of writing was 4.0.20. If you are offered options such as 'Max', 'Debug' and 'Standard', choose standard.

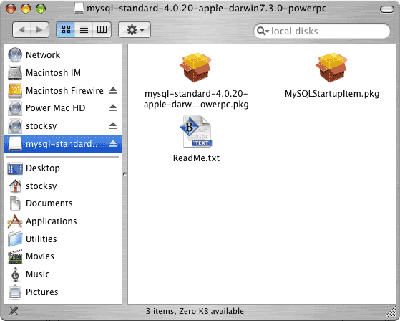
When you've downloaded and mounted the disk image, you'll see that it contains two packages, one for MySQL itself and another for a startup item to launch MySQL on each boot. Install MySQL first, then the startup item.

When the install completes, open the Terminal. If you look in /usr/local, you'll see that MySQL has been installed there:
Last login: Tue Aug 17 12:11:11 on ttyp1

Welcome to Darwin!

PowerBook:~ stocksy$ cd /usr/local/

PowerBook:/usr/local stocksy$ ls

bin

lib

man

mysql

mysql-standard-4.0.20-apple-darwin7.3.0-powerpc

php

php5

sbin

src
mysql is a symlink to mysql-standard-4.0.20-apple-darwin7.3.0-powerpc, which is handy when it comes to upgrading. At this point, it's a good idea to add /usr/local/mysql/bin to your path variable. This is done by opening /etc/profile and appending the path. Type
sudo pico /etc/profile
You'll see:
# System-wide .profile for sh(1)


PATH="/bin:/sbin:/usr/bin:/usr/sbin"

export PATH


[ -r /etc/bashrc ] && source /etc/bashrc
Add the MySQL path to PATH="/bin:/sbin:/usr/bin:/usr/sbin" so that it reads PATH="/bin:/sbin:/usr/bin:/usr/sbin:/usr/local/mysql/bin" then press control+o, enter, control+x to save. You'll need to open a new terminal window for the changes to take effect.
If everything went OK, typing mysqladmin at the prompt should now give you a list of options for that command.
Start MySQL
If you don't use the startup item, or if you haven't rebooted since you installed MySQL, you'll need to start the daemon (mysqld) manually. To do so, type this in the terminal:
sudo bash

safe_mysqld &

exit
MySQL will start, the '&' backgrounds the mysqld process. The first thing to do is set a root password, which is accomplished with:
mysqladmin -u root password 'your-password-including-the-quotes'
Now, you can connect to MySQL by typing
mysql -u root -p
If you provide your password, you'll finally be given a MySQL prompt:
PowerBook:~ stocksy$ mysql -u root -p

Enter password:

Welcome to the MySQL monitor.  Commands end with ; or \g.

Your MySQL connection id is 53 to server version: 4.0.20-standard


Type 'help;' or '\h' for help. Type '\c' to clear the buffer.


mysql>
Switch to the MySQL configuration database:
mysql> use mysql

Reading table information for completion of table and column names

You can turn off this feature to get a quicker startup with -A


Database changed
For security, it's a really good idea to delete the default users who have permission to access the database over the netowork.
mysql> DELETE FROM user WHERE user = '';

Query OK, 2 rows affected (0.09 sec)


mysql> DELETE FROM user WHERE user = 'root' and password = '';

Query OK, 1 row affected (0.30 sec)


mysql> flush privileges;

Query OK, 0 rows affected (0.18 sec)
Again, for security, I'm removing the test database (which could otherwise be accessed by any user)
mysql> drop database test;

Query OK, 0 rows affected (0.29 sec)
Stopping MySQL
Type:
mysqladmin -u root -p shutdown
Creating a user for PHP
Earlier, I said that PHP can connect to MySQL. It's not a very good idea to give it root access, just as you don't have MySQL run as root on your Mac. You can make a add a user from the MySQL prompt like this:
mysql> grant select, insert on databasename.* to username@localhost identified by 'your-password-including-the-quotes';
Here, I've given the user insert and select privileges, you can grant whatever privileges you need to.
Backup up MySQL
There are several way of doing this, but I like to use mysqldump. Type this in terminal:
mysqldump -u root -p database > /path/where/you/want/to/backup.sql
If you want to do this as part of a cron job, remember you'll need to supply the absolute path to mysqladmin. You can supply the root password as an argument after -p, but remember that it'll be stored in plain text.
Restoring a backup
Create a database with the same name as the one you are importing, then type this in terminal:
mysql -uroot -p databasename '/file/location.sql'
Tip: If you have (or are willing to install) PHP, try phpMyAdmin.
